From Current to Glow: What Happens Inside an LED
How an LED produces light explains its colour, heat and behaviour, helping you choose suitable lamps and identify common causes of flicker or dimness.
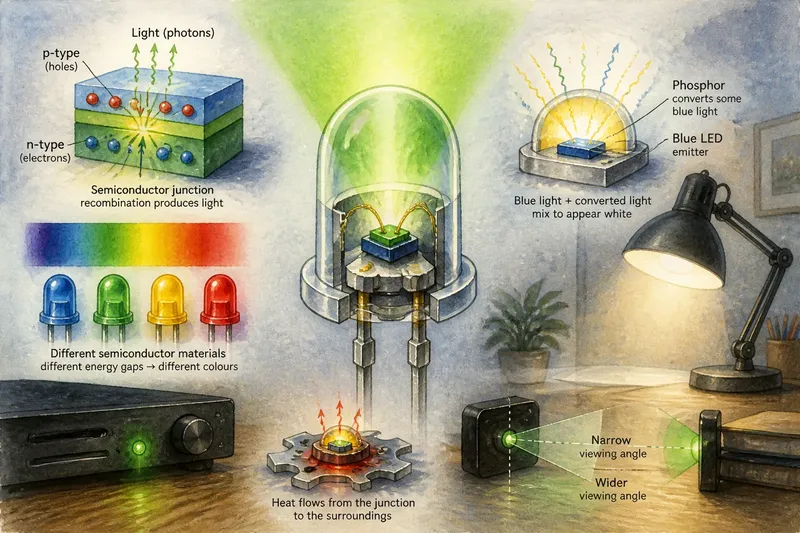
The common mistake with an LED is to treat it like a tiny incandescent bulb: apply power, get light, and assume a coloured cover creates its hue. How an LED produces light is less simple: semiconductor materials convert electrical energy into photons, while the package can filter or redirect what emerges. That distinction helps explain colour, heat and common faults.
Current meets a junction, not a glowing wire
An LED contains a semiconductor junction made from adjoining regions prepared to carry electrical charge in different ways. Apply a suitable voltage in the forward direction and electrons and positively charged “holes” move towards the junction. When they meet, some of their energy is released as light.
The conversion happens within the semiconductor, rather than in a filament heated until it shines. A circuit must limit and control the current because the junction is not, by itself, a forgiving load. In a household lamp that control is built into the driver; in a small indicator it may be part of the surrounding circuit.
Light is emitted in packets called photons. The energy of each photon is tied to the semiconductor’s electronic structure, so the material helps determine the wavelength—and therefore the visible colour—of the LED.
Semiconductor composition sets the colour
Different compound semiconductors have different energy gaps, the energy difference involved when an electron recombines with a hole. A larger gap corresponds to a higher-energy photon, generally towards the blue or violet end of the visible spectrum; a smaller one produces lower-energy light, generally towards red. The precise choice of material and its composition is what makes a particular emission band possible.
Common LED families use compound semiconductors based on elements such as gallium, arsenic, phosphorus, indium and nitrogen. Their proportions and layered structure can be adjusted to produce different colours. A red indicator and a blue status light may share a similar-looking package while containing distinctly different light-emitting material.
A clear lens does not create the LED’s colour. A coloured lens or filter can absorb some wavelengths and change the light that escapes, but it cannot turn a red-emitting junction into an efficient blue source. The distinction matters when replacing an indicator: matching the package shape alone may leave you with the wrong colour or electrical behaviour.
White LEDs combine emission with conversion
Many white LEDs begin with a blue-emitting semiconductor. A phosphor coating absorbs some of that blue light and re-emits light across a broader range of wavelengths. The remaining blue and converted light mix in the eye as white.
Some designs use several emitters of different colours and combine their output instead. These approaches can look similar at a glance, but their spectra—the distribution of light across wavelengths—differ. That spectrum affects how colours in objects appear, even when two sources both seem white.
For a desk lamp, a warm-looking white may feel softer, while a cooler-looking white can make a work surface appear more neutral. Colour appearance alone does not tell you how faithfully the lamp renders coloured materials; product information on colour rendering and colour temperature can help make that choice more deliberate.
The package shapes what leaves the junction
The bare light-emitting region is small, but an LED package may include a transparent encapsulant, phosphor, reflective surfaces and a lens. These parts protect the semiconductor and influence how light is gathered or spread. A domed indicator often sends light into a narrower viewing pattern than a broad, flat package.
This is why two LEDs with the same nominal colour can look different from different angles. The package may direct more light forward, or the phosphor and optical layers may alter its distribution. When choosing a replacement, check the specified viewing angle as well as colour and electrical requirements if the indicator must be visible from the side.
Imagine a music player with a green indicator that is hard to see from across the room. Its owner replaces the narrow-angle part with a wider-angle LED of compatible electrical characteristics. The expected result is a signal that is more visible from the side, though it may look less intense when viewed head-on; the package and placement matter as much as the label “green”.
Electrical energy also becomes heat
Not all the electrical energy supplied to an LED leaves as visible light. Some becomes heat in the semiconductor and other parts of the device. That heat must travel away through the package and, in higher-power lamps, into a heat sink or the fixture around it.
Heat can affect output and colour over time, so designers pay attention to the path from the junction to the surroundings. A compact bulb may feel warm at its base even though its light is produced without a glowing filament. The warmth is a reminder that an efficient light source does not mean a source with no heat.
For a replacement lamp, use the fixture’s stated compatibility and the manufacturer’s guidance. An enclosed fitting can retain heat, and a lamp intended for open air may not be suitable there. For an integral LED fixture, the relevant choice may be replacing the whole fitting rather than changing a bulb.
What should you check when an LED looks wrong?
Start by noting the symptom and checking the lamp or indicator against its label and installation instructions. The observations below help separate a source or package issue from a control or supply problem; do not open a mains-powered fitting, and seek qualified help if it is damaged, unusually hot or behaving erratically.
- Check whether the LED is the specified colour. If the light is consistently the wrong hue, compare the part or lamp marking with the required colour; if they differ, choose a compatible colour-matched replacement, otherwise inspect the lens or filter for a tinting effect.
- Check whether light is visible from the required angle. If it is clear head-on but weak from the side, compare the package’s viewing pattern with the installation; if the pattern is too narrow, choose a compatible wider-angle part, otherwise check whether an obstruction is blocking the light.
- Check whether a white lamp’s appearance suits the room. If it looks too warm or cool beside the intended surroundings, compare its colour-temperature and colour-rendering information with the task; if those properties do not suit it, select a better-matched lamp, otherwise check whether another nearby light is changing the comparison.
- Check whether flicker occurs only while dimming. If the lamp flickers on a dimmer but appears steady at full output, consult the lamp and dimmer compatibility information; if they are incompatible, use a compatible control or lamp, otherwise stop using it and have the fitting checked if the flicker continues.
- Check whether the lamp is seated as instructed. If it is visibly loose or misaligned and the instructions permit user adjustment, switch it off and reseat it as directed; if it is damaged or the connection remains uncertain, leave it off and contact a qualified person.
- Check whether dimness or colour change is accompanied by erratic behaviour. If output fluctuates, the casing is damaged, or the fitting seems unusually hot, stop using it and seek qualified help; if the lamp is stable, compare its specification with the fixture and replace it only with a compatible part.
Why does an LED need a driver, and what changes its appearance?
Why does an LED need a driver?
The junction needs a controlled current, while the available supply may have a different voltage or may be alternating current. A driver regulates the supply to suit the LED and may also shape dimming behaviour. A lamp that flickers or refuses to dim can reflect a mismatch between its driver and the control, not a change in how its semiconductor makes light.
Can a coloured cover change an LED’s colour?
A cover can filter the emitted light, making it appear more saturated or dimmer by absorbing some wavelengths. It cannot add wavelengths that the source does not produce. For a true colour change, the emitter or a suitable multi-colour system must supply the desired light.
Why can white LEDs look different from one another?
White LEDs can use different phosphors, emitter combinations and spectral balances. Those differences affect both the apparent warmth of white and how nearby colours look under the lamp. Compare the stated colour temperature and colour-rendering information, then judge the lamp in the room where it will be used.
Why does an LED become dim or change colour?
Heat, ageing components, a failing driver or a poor electrical connection can alter an LED lamp’s output. A colour shift may also be more noticeable in a phosphor-converted white LED than in a single-colour indicator. If the lamp behaves erratically, stop using it when there are signs of damage and seek qualified help for any mains-powered fitting.
Material, circuit and package explain the glow
How an LED produces light comes down to three linked choices: semiconductor composition sets the emitted wavelengths, the circuit supplies controlled current, and the package manages and directs the light. A coloured indicator, a white household lamp and a device status light may all be LEDs, but their visible character is shaped by different combinations of those parts.
When selecting one, begin with the actual job: the colour you need, the direction from which it must be seen, and the fixture or circuit it must suit. Check the manufacturer’s instructions for compatibility; understanding the junction makes clear why those details matter.